Thursday, September 22, 2011

Grilled Beef and Vegetable Kabobs

kabobs


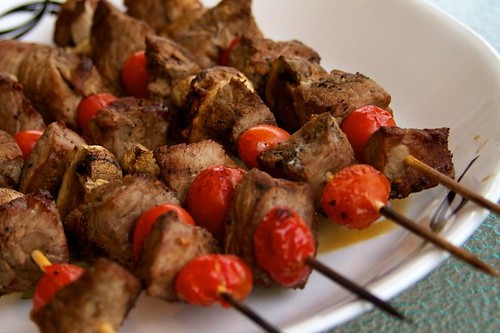
Now that the summer is coming to an end, it is finally comfortable enough down here in Florida to start grilling out back again. In an effort to eat more protein and veggies, I am looking for recipes that are filling without having to add a carb-filled side dish. These kabobs are really good and the recipe is extremely flexible. I made these with tomatoes and mushrooms since that's what I had on hand, but any veggie that you can skewer with a stick would work. I try to limit the amount of red meat I eat, but if you get a nice lean cut of meat like a sirloin or flank steak, it's fine to eat every now and then. This makes a filling meal, perfect right before a jog or workout.

Ingredients:

2 lbs lean sirloin steak, cut into 1" x 1" chunks
Cherry or grape tomatoes
Button or baby bella mushrooms
Dash of your favorite steak seasoning
1/4 cup low sodium soy sauce
1 tbsp Dijon mustard
1 tbsp Worcestershire sauce
Dash of salt and pepper
splash of red wine or balsamic vinegar (optional)
Kabob skewers (metal or wood)

Directions:

1. Rub steak seasoning into steak cubes

2. Combine soy sauce, dijon mustard, worcestershire sauce, salt, pepper, and vinegar in a 1-gallon plastic bag. Add steak chunks to bag and marinade 30 min to 1 hour (or overnight for best flavor)

3.  If using wood skewers, soak for 10-20 minutes to prevent burning on the grill. 

4. Assemble kabobs using vegetables and steak, alternating each to fill the kabob skewer

5. Grill on med-high for 10-15 minutes, turning every few minutes to cook all sides of the steak and char the vegetables

Wednesday, September 21, 2011

Savory Parmesan Oven Fries


IMG_1803

It's been a long time since my last blog post! It's not easy blogging while working full time, but I always try to come back to my blog and add the recipes I'm most excited about. I recently completed a large project at work that kept me extremely busy, but I've had some time in the last few days to get things together. I have also decided to add some content to the blog in the coming weeks that I hope you enjoy. The new content will deal a lot with my recent experience getting fit with the help of P90X from Beachbody. I've been trying to come up with healthy meals and snacks that will help me meet my goals.

Today's recipe has been a long time in the making. My family loves french fries, but they just don't fit into a healthy lifestyle at all. As easy as it can be to pop some pre-packaged fries in the oven for the kids, I knew there had to be a better way. I've recently perfected this recipe so that it makes tasty, crispy fries that taste way better than the fried version. The secret is to coat the fries with spices that add to the flavor without needed a ton of fat. I am also working on a sweet potato version to pack even more nutrients into this side dish. 

Ingredients:

2-3 Baking Potatoes, washed and cut into strips
1 tablespoon olive oil
1-2 tablespoons parmesan cheese
1 teaspoon garlic powder
1 teaspoon paprika
1 teaspoon onion powder
1/2 teaspoon freshly ground pepper
Cooking Spray

Directions:

1. Preheat oven to 450 degrees F

2. Soak potato slices in warm water for 10 minutes.  Drain and rinse clean. Place slices in a large bowl. *Do not skip this step, rinsing the potatoes removes starch from the surface of the potato and makes for a crispier fry*

3. Drizzle olive oil over potato slices and mix with your hands to coat every slice

4. Mix the Parmesan cheese, garlic powder, onion powder, and paprika in a small bowl. Slowly mix in spice blend with your hands to coat the potato slices. 

5. Spray a baking pan very well with cooking spray (or use nonstick pan, but these do STICK! so be careful). Lay out potato slices in a single layer on the baking pan. 

6. Cook fries for 30 minutes in the oven, turning fries with a spatula about halfway through. 

Wednesday, August 3, 2011

Mini Cini's

IMG_1545


I'm always looking for fun things to make on the weekends for breakfast. If I don't make something, we usually end up going out to breakfast or picking up Dunkin Donuts, which definitely adds up after a while. This recipe is relatively cheap and easy to make. I made the rolls ahead of time the night before so they were ready to cook in the morning. I also made two batches of this and froze half of them to have some other time.

These little mini cinnamon buns were a big hit with the kids, especially Avery who is all about eating miniature foods. They are not healthy by any stretch, but they are not as bad as some of the pre-made cinnamon buns you can buy at the store. I serve them with a turkey sausage and egg scramble and everyone leaves the table ready for the day. I will definitely be making these cuties again.

Ingredients

1 (8-ounce) can refrigerated crescent rolls
4 tablespoons butter or margarine, softened
1/3 cup firmly packed brown sugar
1/4 cup chopped pecans
1 tablespoon sugar
1 teaspoon ground cinnamon
2/3 cup powdered sugar
1 tablespoon milk
1/4 teaspoon almond or vanilla extract
1/8 teaspoon salt

Directions

1. Unroll crescent rolls, and separate each dough portion along center perforation to form 3 rectangles; press diagonal perforations to seal.

2. Stir together butter and next 4 ingredients; spread evenly over 1 side of each rectangle.

3. Roll up jellyroll fashion, starting at long end. Gently cut each log into 1-inch-thick slices, using a serrated knife. Place rolls, 1/4 inch apart, into 2 (8-inch) greased cakepans.

4. Bake at 375° for 11 to 15 minutes or until golden. Cool 5 to 10 minutes.

5. Stir together powdered sugar and remaining ingredients. Drizzle over warm rolls.

Note: To make slicing easier, place unbaked rolls on baking sheet, and freeze for 10 minutes.

Adapted from Cooking Light

Monday, August 1, 2011

Shredded Chipotle Beef Tacos

IMG_1511


There are times when I decide that I want to try a cooking technique just for the sake of trying it. I don't NEED to have freshly made corn taco shells, but I was tempted to make some so I could say I can do it. The tacos came out great, they were crunchy on the outside but also had a chewy texture. Would I do this every time we have a taco night? No, probably not. maybe if we had company over but it does take some time and it's a bit of a splurge, so it's a once-in-a-while kind of treat.

I've made the beef recipe before and it's great in pretty much everything, I use it in burritos, enchiladas, tostadas, and even as a pizza topping. It's an easy recipe because it takes just a little prep and it cooks in the crock pot all day. I love the smokey flavors of the chipotle and smoked paprika and the texture of the beef is perfect after cooking all day.

Ingredients

2 Tbsp olive oil, divided
2 lb boneless chuck roast
1 tsp chili powder
1/2 tsp cumin
1/2 tsp smoked paprika
1 cup beef broth
1 Tbsp tomato paste
2 chipotle peppers in adobo sauce, minced
1/2 large sweet onion, diced
4 cloves garlic, minced
1 Cup Canola Oil
Corn Tortillas
choice of toppings – lettuce, salsa, guacamole, sour cream, etc.

Directions

1. Combine the spices in a small bowl. Rub into the beef, covering all the nooks and crannies and each side evenly.

2. In a large skillet, heat 1-2 tablespoons olive oil until shimmering. Sear the meat on each side, using tongs to flip it. Remove and place in the bottom of a large slow cooker.

3. With the skillet remaining over the heat, deglaze with the beef stock and scrape up any brown bits. Whisk in the tomato paste and chipotle peppers. Once sauce comes to a boil, reduce the heat and simmer for a few minutes until slightly thickened and reduced.

4. Meanwhile, add the onion and garlic to the top of the beef in the slow cooker. Carefully pour the sauce over top. Cover and cook on low for 6 to 8 hours.

5. To make the taco shells, heat the oil in an 8-inch skillet over medium heat. Slide a tortilla into the oil; use tongs to fold the tortilla in half and hold it partially open. Flip after about 1 minute. Fry for an additional minute, until the tortilla is slightly crisp. Continue with the remaining tortillas, storing the fried tortillas in the warm oven.

6. Once the meat is fork tender, remove and shred with two forks. Pour a portion of the sauce, over top of the meat and let soak to enhance flavor.

Adapted from Pennies on a Platter and The Way the Cookie Crumbles

Wednesday, July 27, 2011

Easy Mexican Casserole

IMG_1403


I like a good casserole every once in a while. I especially like ones that contain beans, some veggies, and a meat that can be switched out for some lean turkey breast meat. This one is a little on the indulgent side because of the cheese and tortilla chips, but it was a delicious dinner with just enough spice and a decent amount of veggies mixed in. When I make it again, I’ll add some corn to the mix and substitute some oven-browned tortillas or brown rice for the chips.

I still find it a huge challenge to come up with a good casserole photo. They never look as good as they taste, but I can assure you, this was a yummy dinner!

Ingredients

1 pound lean ground turkey (or beef
1 can Chili Beans
1 10-12 ounce bag tortilla chips, crushed
1 can Ro-tel tomatoes
1 small onion, minced (optional)
2 cups shredded cheddar cheese, divided
1 package taco seasoning
1 can cream of chicken soup
1/2 cup water
sour cream and salsa for serving

Directions

1. Preheat oven to 325 degrees.

2. In a large skillet, brown meat and drain off fat. Stir in beans, tomatoes, onion, taco seasoning, soup and water. Simmer over medium-low heat until everything is well combined and heated through.

3. Grease a 9×13 casserole dish. Put down a layer of crushed tortilla chips, followed by a layer of the meat/bean mixture, then half of the cheddar cheese. Repeat the layers one more time.

4. Cover with foil and bake for 20-30 minutes, or until bubbly. Optional: brown cheese topping under the broiler on high for 2-3 minutes.

5. Let sit for 5-10 minutes before serving. Top with sour cream and salsa. Enjoy!

Source: Adapted from Sing for your Supper

Monday, July 25, 2011

Mike's Favorite Rice Pilaf

IMG_0805


I first saw this method of cooking rice years ago on 30 Minute Meals with Rachel Ray. I really loved the simplicity of this recipe and I was surprised by the flavorful rice that results. This is my husband's favorite side dish, so I make it all the time.

Another great thing about this recipe is the flexibility in the ingredients. The basic recipe is great with grilled meats and veggies because it's yummy without overpowering a meal. You can also add veggies and spices to create a whole new dish, here are some of my suggestions:

- Add 1 tsp turmeric and frozen peas to go with Indian spiced meats and veggies
- Substitute one can of ro-tel tomatoes for 1/2 cup of the chicken stock and add 1 tsp ground cumin for mexican rice.
- Substitute jasmine scented water (steeped with Jasmine tea) with the chicken broth for Jasmine rice to go with grilled fish or Thai spiced foods.
- Add 1/4 cup of toasted, slivered almonds or pine nuts

This dish cooks up in 20-25 minutes from start to finish, most of which is the 16-minute covered cook time, so it's great for weeknight meals.

Ingredients

2-3 tbsp butter
¾ cup long grain white rice
1/3 cup dry vermicelli noodles, broken up into small pieces (1/4 - 1/2 inch)
2 cups chicken stock
1 tsp Seasoned salt or other favorite seasoning

Directions

1. Melt butter in a medium saucepan over medium heat.

2. Add vermicelli and coat with butter.

3. Add rice and cook for 2-3 minutes to brown rice and pasta. Add seasonings and stir into rice mixture.

4. Add chicken stock and bring to a boil.

5. Reduce heat, cover, and simmer for 16 minutes or until all liquid is absorbed.


Adapted from 30 Minute Meals with Rachel Ray

Thursday, July 21, 2011

S'mores cookies

IMG_0748


I kept seeing this recipe over and over on my Google Reader and I finally got a chance to make it. A friend brought these to a BBQ at our house a while ago and I remember loving them! It looks like it might be complicated but it is actually really easy. The cookies are cooked a bit first, then removed from the oven to place the chocolate and marshmallows so they are the perfect when they come out of the oven.

I found that the addition of the graham cracker crumbs to the cookie mix made for a really nice, crumbly texture. I also loved the large chunks of Hershey’s chocolate squares and the melty, browned marshmallow, yum! These cookies were a huge hit with my family and this recipe made a lot of cookies, almost 3 dozen. Definitely a great cookie for some summer fun.

IMG_0756


Ingredients

1 1/2 cups all purpose flour
1 cup graham cracker crumbs
1 teaspoon baking soda
1 teaspoon salt
1 dash of cinnamon
1 cup (2 sticks) butter, softened
3/4 cup sugar
3/4 cup brown sugar
1 teaspoon vanilla extract
2 eggs
2 cups miniature chocolate chips
1 1/2 cups mini marshmallows
2 Hershey bars, chopped

Directions

Preheat oven to 375 degrees.

1. In a medium bowl combine the flour, graham cracker crumbs, baking soda, salt, and dash of cinnamon.

2. In a second larger bowl beat together the butter, sugar, brown sugar and vanilla extract until creamy. Add the eggs one at a time, beating well after each addition.

3. Slowly beat in the flour mixture until smooth, setting aside 2 tbsp flour mixture. Tip: Stir the chocolate chips into the leftover flour mixture first before mixing into the batter, this will keep the chips from sinking to the bottom of the cookie batter. Stir flour-coated chocolate chips into batter.

IMG_0746


4. Drop by rounded tablespoon onto ungreased cookie sheet.

5. Bake for 8 minutes, and remove from the oven. Push 3 to 4 marshmallows and a few pieces of hershey bar into each cookie. Return to the oven and bake an additional 3-4 minutes until fully cooked. Cool cookies on a wire rack

Adapted from Stephanie Cooks

Wednesday, July 20, 2011

Fish with Black Beans and Corn in a Foil Packet

Foil baked fish 2

There is something about cooking food in a foil packet that makes me giddy. You mix a bunch of ingredients together and put them into a packet, and when it’s finished cooking, you get to open it like a present and it’s cooked perfectly and smells amazing. This type of thing excites me, I can't help it.

Foil-baked fish 1

I found this recipe on several blogs, but I got this from Pink Parsley and followed most of the recipe, but decreased the amount of butter slightly. I love the mix of spicey chipotle pepper and sweet oranges, and the fact that it’s relatively low carb and full of healthy ingredients. You can also get very creative with this recipe, subbing out different spices and juices to find what suits your taste. Enjoy!

Ingredients

4 skinless white fish fillets (6 to 8 oz each), 1-inch thick
salt and pepper

4 Tbsp unsalted butter, softened
2 tsp minced chipotle chiles in adobo sauce (seeds removed, unless you want very spicy!)
1 tsp grated orange zest
2 Tbsp freshly squeezed orange juice
2 cloves garlic, minced
1 (16-oz) can black beans, rinsed and drained
2 cups corn kernels
1/2 red onion, minced
2 scallions, minced
1/4 cup chopped fresh cilantro

Directions

1. Adjust the oven rack to the lower-middle position and heat to 450 degrees.

2. Pat the fish dry with paper towels and season with salt and pepper. Using a fork, mix together the butter, 1 teaspoon chipotle, orange zest, half the garlic, 1/2 tsp salt, and 1/4 tsp pepper in a medium bowl until well-combined. Spread butter mixture over the fish.

3. Combine the beans, corn, onion, scallions, 2 tablespoons of cilantro, orange juice, remaining chipotle, remaining garlic, scallions, 1/2 teaspoon salt, and 1/4 teaspoon pepper in a bowl.

4. Lay four 14-inch lengths of foil on the counter and divide the bean mixture evenly over the lower half of each piece of foil. Top with fish, and fold the foil over the fish, folding the edges to seal.

5. Arrange the packets in a single layer on a rimmed baking sheet and bake until the fish is just cooked through, 15 to 20 minutes. Carefully open the packets and sprinkle with remaining cilantro. Serve.

Banana Peanut Butter Chocolate Chip Mini Muffins

Mini-muffins


We have a mini-muffin monster in our house. She’s about 2 feet tall, brown hair, and will stop at nothing to eat as many mini muffins as possible.I'm not sure how this started, we noticed when we went out to breakfast one morning that Avery was in love with the blueberry muffin that we ordered for her. From then on, we always ordered her a muffin for her breakfast when we went out. I then figured she'd like it in a smaller size, so I made her blueberry mini-muffins from a box mix. She went nuts, she is in love with mini muffins now. She grips them in her little hands and goes wild. She actually does a little dance when she gets one. I usually give her two in the morning with breakfast and then maybe a snack later on in the day. She's really picky lately, so even if this isn't the healthiest option in the world, it is something she will eat.

This recipe is adapted from a few I have found around the internet. I wanted to make it semi-healthy but still yummy enough for a kid to like. I added banana for a fruit component, peanut butter for some good fats and protein, and then a small amount of chocolate chips just for fun. I had a few of these and they turned out really good, they were great for breakfast on the go. I plan on trying some different mini-muffin recipes next week, maybe a lemon poppyseed or or navel orange? Yum!

Ingredients

2 brown bananas
1/4 cup sugar
1 egg
3 TBS melted butter
1 tsp baking soda
1 tsp baking powder
1/4 tsp kosher salt
1 cup flour
2 tsp peanut butter
½ cup mini chocolate morsels

Directions

1. Preheat oven to 350 degrees.

2. Peel the bananas and mush the bananas in a medium sized mixing bowl. Add sugar, egg, and butter and mix well.

3. Stir in baking soda, powder, salt, flour and peanut butter. Mix well with a mixer or a spoon.

4. Stir in chocolate chips

5. Grease the cups of a mini muffin tin. Fill 3/4 full with batter and bake 13-15 minutes, until just golden.

6. Turn the muffins out onto a cooling rack.

Monday, April 11, 2011

Basic Sunday Morning French Toast

IMG_0426

This is a Sunday morning favorite for my family. It's just a basic recipe for making french toast out of cinnamon bread that can be found at any grocery store. Different breads are also fine to use with this recipe. You can use challah bread, French baguette, you can even use banana or pumpkin bread.

French Toast doesn't have to be fancy, you need very few ingredients and it's relatively cheap to make. This recipe goes great with fruit or breakfast meats on the side.

Basic Sunday Morning French Toast

Ingredients

2 tbsp butter, plus more if needed
1 Loaf cinnamon bread ( I use Pepperidge Farm)
2 Eggs
1 tbsp milk
1 tsp cinnamon

Directions

1. Heat butter in a large skillet or griddle on medium heat
2. In a large, shallow bowl, beat eggs, milk and cinnamon with a fork until well combined
3. Dip pieces of bread into the egg mixture, coating both sides
4. Brown both sides of the bread in the skillet, being careful not to burn. Add butter as needed to cook all of the French Toast.
5. Serve with syrup, fruit, or powdered sugar. Enjoy!

IMG_3969

Super Simple Weeknight Lo Mein

IMG_3954
I've been exerimenting with this recipe for a while and finally came up with a good balance of ingredients to make a healthy lo mein in a hurry. It usually takes me about 30 minutes tops to make this, so it's perfect after a busy day at work. It's also easy to customize this lo mein to suit your tastes. You can add different vegetables for some variety; use beef, shrimp, or pork instead of chicken, or you can make it a vegetarian meal. The only thing I would not recommend is using whole wheat spaghetti noodles, they can get gooey when you're frying them up in your wok. Otherwise, feel free to get creative!

Super Simple Weeknight Lo Mein

Ingredients

2 tbsp vegetable or canola oil
2 tbsp teriyaki marinade
2 boneless skinless chicken breast halves, cut into bite size pieces
2 cups sliced carrot
2 cups frozen broccoli
1 cup sliced mushroom
2 garlic cloves, minced
1/2 box spaghetti noodles
1/4 -1/2 cup soy sauce

Directions

1. Mix chicken with teriyaki marinade, set aside for 5-10 minutes (or longer if possible). While the meat is marinating, start cooking the spaghetti noodles until al dente. Drain and set aside.

2. Heat oil in wok or large saucepan on medium-high heat.

3. Add chicken and stir fry until brown, about 3-5 minutes. Reduce heat to medium.

4. Move chicken to the sides of the pan and add sliced carrot and broccoli. Stir fry for 5 minutes.

5. Add mushrooms and garlic and stir fry for about 3 minutes or until mushrooms are cooked through

IMG_3892

6. Add pasta noodles and soy sauce and mix thoroughly to combine ingredients. Serve and enjoy!